Want to know how to dye a leather chair? Yes, you absolutely can dye a leather chair! With the right tools, materials, and a bit of patience, you can dramatically improve its appearance and extend its lifespan. This comprehensive guide will walk you through every step of the process, from assessing your chair’s condition to applying the final coat of sealant. You’ll learn valuable leather upholstery dyeing tips to achieve professional-looking results and save money by avoiding costly reupholstering or replacement.
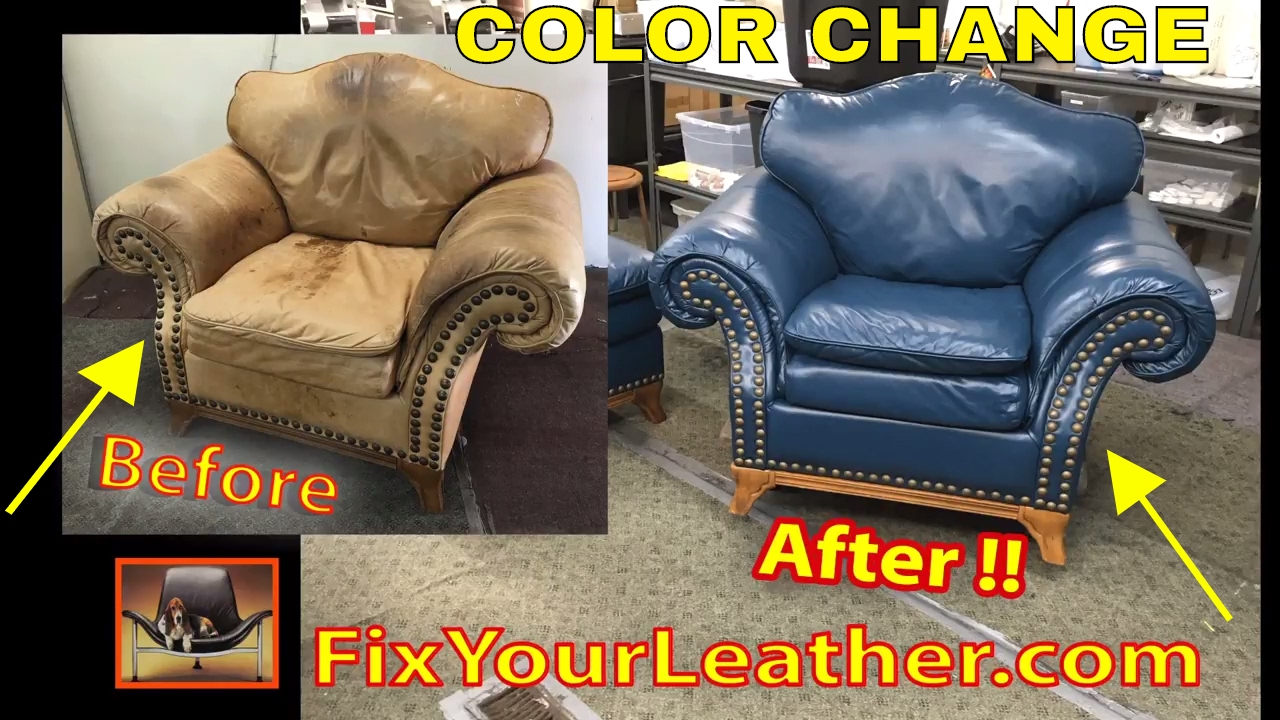
Image Source: i.ytimg.com
Why Dye Your Leather Chair?
Before diving into the “how-to,” let’s look at why you might consider dyeing your leather chair.
- Revive Faded Leather: Sunlight, daily use, and age can cause leather to fade. Dyeing can restore leather chair color and bring back its original vibrancy.
- Repair Scratches and Scuffs: Minor imperfections can be easily concealed with a fresh coat of dye. Leather chair color restoration becomes a practical option.
- Change the Color: Feeling a change? You can completely transform the look of your chair by changing its color to match your updated décor. Discover how to change leather chair color with professional results.
- Save Money: Refinishing is much cheaper than buying a new chair or reupholstering it. Explore leather furniture refinishing as an affordable alternative.
- Extend the Chair’s Life: Proper care and dyeing can prolong the life of your leather chair, preventing cracks and dryness.
Preparing for the Dyeing Process
Success in dyeing a leather chair hinges on careful preparation. This stage sets the foundation for a flawless finish.
Assessing the Leather’s Condition
- Examine the Leather: Look closely for cracks, tears, stains, and areas where the finish is worn. These issues need attention before dyeing.
-
Identify the Leather Type: Different types of leather react differently to dyes. Common types include:
- Aniline Leather: This is the most natural-looking leather, as it has been dyed with transparent dyes that do not cover the surface. It’s soft and supple but also more prone to staining.
- Semi-Aniline Leather: This leather has a light surface coating that provides some protection against stains and wear.
- Protected (Pigmented) Leather: This is the most durable type of leather, as it has a thick coating that protects it from stains and fading. It’s commonly used in furniture due to its resilience.
-
The Water Drop Test: Place a small drop of water on an inconspicuous area.
- If the water absorbs quickly, it’s likely aniline leather.
- If it beads up for a few minutes before absorbing, it’s semi-aniline.
- If it beads up for a long time, it’s likely protected leather.
Gathering Your Supplies
Having everything you need at hand will make the dyeing process smoother and more efficient. Here’s a comprehensive list:
- Leather Cleaner: To remove dirt, oil, and grime.
- Leather Deglazer: To remove the existing finish and prepare the leather to accept the dye.
- Leather Filler (if needed): For repairing cracks and scratches.
- Leather Dye: Choose a high-quality dye specifically formulated for leather. Select the best leather dye for chairs to ensure optimal results.
- Leather Finish/Sealer: To protect the dyed leather and provide a durable finish.
- Soft Cloths or Sponges: For cleaning, deglazing, and applying dye.
- Applicator Pads or Daubers: For precise dye application, especially in corners and crevices.
- Paintbrushes: For applying dye and finish, especially on larger areas.
- Gloves: To protect your hands from the dye.
- Mask: To avoid inhaling fumes from the cleaner, deglazer, and dye.
- Drop Cloths or Plastic Sheeting: To protect your work area.
- Fine-Grit Sandpaper (optional): For smoothing out imperfections after filling.
- Heat Gun or Hair Dryer (optional): To speed up drying times.
Preparing Your Work Area
- Ventilation: Work in a well-ventilated area or outdoors to avoid inhaling harmful fumes.
- Protection: Cover your work surface with drop cloths or plastic sheeting to protect it from spills and stains.
- Lighting: Ensure you have adequate lighting to see the leather’s surface clearly.
Step-by-Step Leather Chair Dyeing Guide
Now, let’s get into the actual dyeing process. Follow these steps carefully for the best results in your DIY leather chair dyeing project.
Step 1: Cleaning the Leather
- Vacuum the Chair: Use a vacuum cleaner with a brush attachment to remove loose dirt and debris from the surface of the chair.
- Apply Leather Cleaner: Apply a leather cleaner to a soft cloth and gently wipe down the entire chair. Follow the manufacturer’s instructions for the cleaner.
- Remove Excess Cleaner: Use a clean, damp cloth to remove any excess cleaner from the leather.
- Allow to Dry: Let the chair dry completely before moving on to the next step.
Step 2: Deglazing the Leather
- Apply Deglazer: Apply a leather deglazer to a soft cloth and wipe down the entire chair. This step removes the existing finish and prepares the leather to accept the dye.
- Work in Sections: Work in small sections, applying the deglazer and wiping away the loosened finish.
- Multiple Coats (if needed): For protected leather, you may need to apply several coats of deglazer to remove the finish completely.
- Allow to Dry: Let the chair dry completely after deglazing.
Step 3: Repairing Damage (if needed)
- Apply Leather Filler: If there are cracks, scratches, or other damage, apply a leather filler to these areas.
- Smooth the Filler: Use a palette knife or your finger to smooth the filler and blend it with the surrounding leather.
- Allow to Dry: Let the filler dry completely according to the manufacturer’s instructions.
- Sand (if needed): If the filler is not perfectly smooth after drying, use fine-grit sandpaper to smooth it down. Be careful not to sand the surrounding leather.
Step 4: Applying the Leather Dye
- Test the Dye: Before applying the dye to the entire chair, test it on an inconspicuous area to ensure you like the color.
- Apply the Dye: Apply the leather dye to a soft cloth, applicator pad, or paintbrush.
- Work in Sections: Work in small sections, applying the dye in a thin, even coat.
- Apply Evenly: Avoid applying too much dye in one area, as this can lead to uneven color.
- Multiple Coats: Apply multiple thin coats of dye, allowing each coat to dry completely before applying the next. This will help you achieve a more even and consistent color.
- Drying Time: Allow each coat of dye to dry completely before applying the next. This may take several hours, depending on the dye and the environment. A heat gun or hair dryer can speed up the drying process, but be careful not to overheat the leather.
Step 5: Applying the Leather Finish/Sealer
- Apply the Finish: Once the dye is completely dry, apply a leather finish or sealer to protect the dyed leather and provide a durable finish.
- Apply Evenly: Apply the finish in a thin, even coat, using a soft cloth, applicator pad, or paintbrush.
- Multiple Coats: Apply multiple thin coats of finish, allowing each coat to dry completely before applying the next.
- Drying Time: Allow the finish to dry completely according to the manufacturer’s instructions. This may take several hours or even overnight.
Leather Chair Dye: Color Selection
Choosing the right color is crucial.
- Matching the Original Color: If you’re repairing faded leather, try to match the original color as closely as possible. Take a sample of the leather to a professional leather supplier for color matching.
- Changing the Color: If you’re changing the color of your chair, consider your existing décor and choose a color that complements it. Darker colors are generally easier to achieve, as they cover existing colors more effectively.
- Color Samples: Always test the dye on an inconspicuous area before applying it to the entire chair. This will give you a better idea of the final color and how it will look on your leather.
Leather Upholstery Dyeing Tips for Success
- Patience is Key: Dyeing leather is a time-consuming process. Don’t rush it!
- Thin Coats are Better: Multiple thin coats of dye and finish are better than one thick coat. This will help you achieve a more even and consistent finish.
- Follow Instructions: Always follow the manufacturer’s instructions for the cleaner, deglazer, dye, and finish.
- Practice Makes Perfect: If you’re new to dyeing leather, practice on a scrap piece of leather before working on your chair.
- Proper Ventilation: Work in a well-ventilated area to avoid inhaling harmful fumes.
- Protect Your Hands: Wear gloves to protect your hands from the dye and chemicals.
- Clean Your Tools: Clean your brushes and applicator pads immediately after use to prevent the dye from drying and ruining them.
- Condition Regularly: After dyeing, condition your leather chair regularly to keep it soft and supple.
Repairing Faded Leather Chair: Specific Advice
Is your main goal to just repair a faded leather chair? Here’s some specific advice.
- Gentle Cleaning: Start with a very gentle leather cleaner. Avoid harsh chemicals that might strip more color.
- Color Matching is Essential: Invest time in accurately matching the original color. Take a piece of the chair (from underneath if possible) to a professional for matching.
- Dye Application Technique: Use a very light touch with a sponge or applicator pad. Focus only on the faded areas. Overlapping onto the non-faded areas is okay but do so very gently.
- Blending is Critical: Blend the newly dyed areas into the surrounding leather. This might involve feathering the edges of the dye application.
- Consider a Color-Enhancing Conditioner: After dyeing, use a high-quality leather conditioner that also enhances color. These products can help even out the overall tone.
Troubleshooting Common Problems
Even with careful preparation, you may encounter some problems during the dyeing process. Here are some common issues and how to fix them:
- Uneven Color: If the color is uneven, apply another thin coat of dye to the lighter areas.
- Streaks: If you see streaks, you may be applying the dye too thickly or unevenly. Try using a softer cloth or applicator pad and applying thinner coats.
- Dye Rubbing Off: If the dye is rubbing off, you may not have deglazed the leather properly, or you may not have applied enough finish. Re-apply the finish, making sure to apply it evenly.
- Cracking: If the leather is cracking, it may be too dry. Apply a leather conditioner regularly to keep it soft and supple.
- Sticky Finish: If the finish is sticky, it may not be fully dry. Allow it to dry for a longer period of time, or use a heat gun or hair dryer to speed up the drying process.
Alternatives to Dyeing
While dyeing is a great way to restore or change the color of your leather chair, there are other options to consider:
- Leather Conditioners: These can help to moisturize and protect the leather, preventing it from fading and cracking.
- Leather Creams and Polishes: These can help to restore the color and shine of the leather.
- Reupholstering: If the leather is severely damaged, reupholstering may be the best option. This involves replacing the old leather with new leather.
- Professional Refinishing: Consider hiring a professional to refinish your chair, especially if it’s a valuable antique or if you’re not confident in your DIY skills.
Fathoming the Cost
How much will this cost you? Let’s look at a breakdown:
| Item | Estimated Cost |
|---|---|
| Leather Cleaner | \$10- \$20 |
| Leather Deglazer | \$15- \$25 |
| Leather Filler | \$10- \$15 |
| Leather Dye | \$20- \$40 |
| Leather Finish/Sealer | \$20- \$30 |
| Applicator Pads/Cloths | \$5- \$10 |
| Gloves & Mask | \$5- \$10 |
| Total | \$85- \$150 |
Keep in mind that professional refinishing can cost several hundred dollars or more. Reupholstering can be even more expensive, potentially costing thousands of dollars. Doing it yourself can save you a significant amount of money.
Frequently Asked Questions (FAQ)
- Can I dye my leather chair a different color? Yes, you can change the color of your leather chair, but darker colors are generally easier to achieve than lighter colors.
- What is the best leather dye for chairs? The best leather dye for chairs is one that is specifically formulated for leather and is compatible with the type of leather your chair is made of.
- How long does it take to dye a leather chair? The amount of time it takes to dye a leather chair depends on the size of the chair, the type of leather, and the number of coats of dye and finish you apply. It can take anywhere from a few hours to a few days.
- How do I clean a dyed leather chair? Clean a dyed leather chair with a mild leather cleaner and conditioner. Avoid using harsh chemicals or abrasive cleaners.
- How can I prevent my leather chair from fading? Protect your leather chair from sunlight and heat. Condition it regularly to keep it soft and supple.
By following this comprehensive guide, you can successfully dye your leather chair, extend its life, and save money. Remember to take your time, prepare carefully, and follow the instructions. With a little patience and effort, you can achieve professional-looking results and enjoy your revitalized leather chair for years to come!
Hello, I’m Muzammil Siddiqui, the mind behind ChairsFly.com.. With a deep passion for chairs and a wealth of expertise, I created this platform to share my insights, experiences, and knowledge about everything chair-related. From ergonomic solutions to stylish designs, my goal is to guide you in finding the perfect seat for your needs. Let’s embark on this journey of comfort and elegance together!