Can I recover a leather chair? Yes, you can! Recovering a leather chair is a worthwhile project, breathing new life into a beloved piece. It’s a great way to save money compared to buying new, personalize your furniture, and even learn a new skill. This guide provides a detailed process for DIY leather chair restoration, covering everything from initial assessment to final touches.
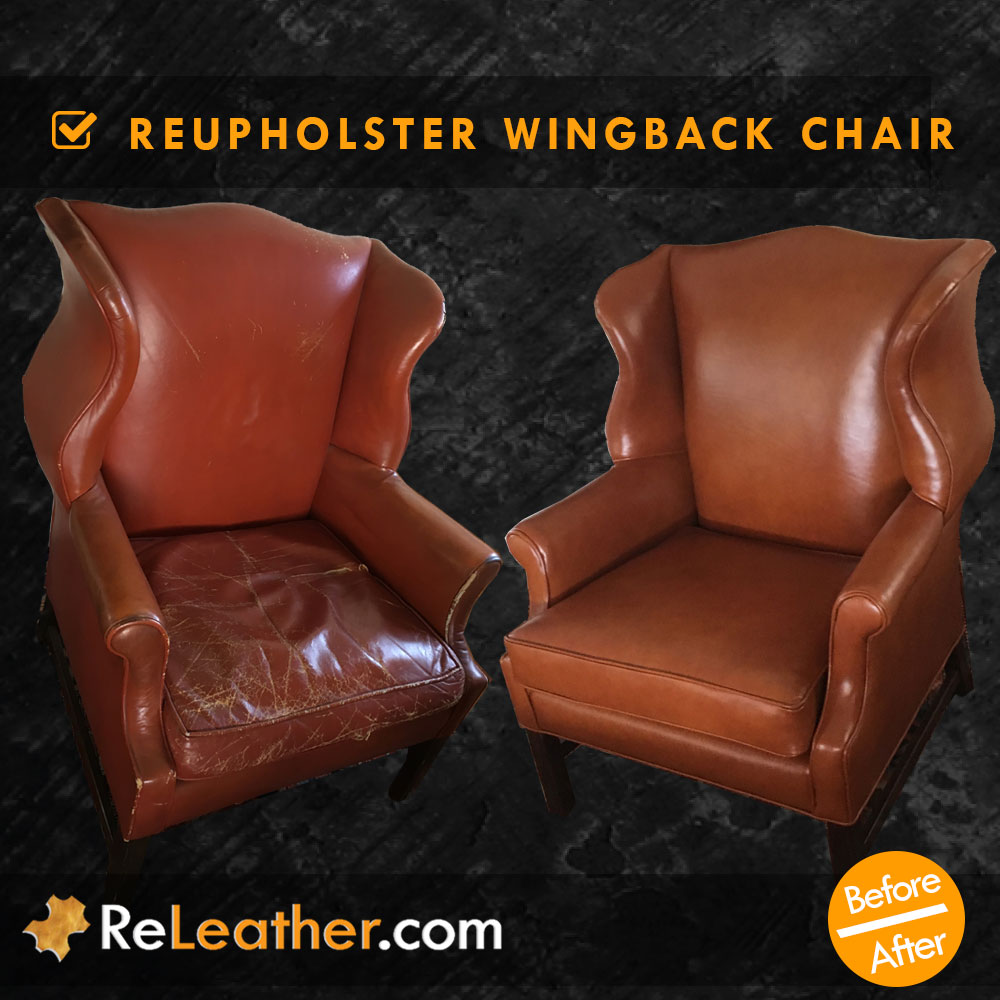
Image Source: www.releather.com
Why Recover Your Leather Chair?
There are many reasons to recover your leather chair instead of buying a new one. Here are some key advantages:
- Cost Savings: Recovering a chair is often much cheaper than purchasing a new, comparable leather chair.
- Personalization: Choose the exact leather type, color, and finish to perfectly match your style and décor.
- Sustainability: Reduces waste by giving an existing piece of furniture a new lease on life.
- Sentimental Value: Preserve a cherished piece of furniture that holds special memories.
- DIY Satisfaction: Enjoy the rewarding experience of completing a restoration project yourself.
Is Your Chair a Good Candidate for Recovery?
Before diving in, assess if your chair is suitable for recovery. Consider these factors:
- Frame Integrity: The frame should be structurally sound. Check for broken joints, wobbly legs, or significant damage. If the frame is severely damaged, repair might be needed.
- Spring System: Evaluate the condition of the springs. Sagging or broken springs may require replacement or repair.
- Foam and Padding: Check the foam and padding for wear and tear. If it’s heavily compressed or crumbling, replacement is necessary.
- Leather Condition: While the leather is being replaced, consider the extent of damage. Minor scratches and fading are normal. However, excessive cracking, tears, or stiffness may indicate extensive damage.
- Complexity: Simple chair designs are easier to recover than those with intricate details and complex shapes.
If the frame, springs, and padding are in decent shape, and you’re comfortable with a moderate DIY project, your chair is likely a good candidate for recovery.
Tools and Materials You’ll Need
Gathering the right tools and materials beforehand will make the recovery process smoother and more efficient. Here’s a comprehensive list:
Tools:
- Screwdrivers (various sizes): For removing hardware and staples.
- Pliers: For removing stubborn staples and tacks.
- Staple Remover: A specialized tool for efficiently removing staples.
- Staple Gun: A heavy-duty staple gun is essential for securing the new leather. Pneumatic staple guns are recommended for larger projects.
- Staples: Choose staples appropriate for upholstery work, typically heavy-duty.
- Sewing Machine: A sewing machine capable of handling leather is necessary for stitching seams and edges.
- Scissors: For cutting fabric and leather.
- Seam Ripper: For carefully removing existing seams.
- Hammer: For tapping staples flush and securing tacks.
- Measuring Tape: For accurate measurements.
- Pencil or Marker: For marking patterns and cutting lines.
- Chalk: For marking on leather.
- Leather Needles: Specifically designed for sewing leather.
- Leather Hammer/Mallet: Useful for flattening seams and setting staples.
- Awl: For creating pilot holes in leather.
- Edge Creaser (optional): For creating a decorative crease along edges.
Materials:
- New Leather: Choose high-quality upholstery leather in your desired color and finish. Consider the weight and durability of the leather based on chair usage. Allow extra material.
- Upholstery Foam: Replace old or worn foam with new, high-density foam for added comfort and support.
- Batting: Use batting to create a smooth surface under the leather and add extra cushioning.
- Burlap or Muslin: Used as a lining material to protect the foam and provide a stable base for the leather.
- Thread: Heavy-duty thread specifically designed for leather sewing.
- Tacks or Decorative Nails (optional): For adding decorative accents.
- Wood Glue (optional): For reinforcing loose joints in the frame.
- Leather Conditioner: For conditioning and protecting the new leather.
Safety Gear:
- Gloves: Protect your hands from staples and sharp tools.
- Safety Glasses: Protect your eyes from flying staples and debris.
- Dust Mask: Protect your lungs from dust and particles.
Step-by-Step Guide to Recovering Your Leather Chair
Follow these steps for a successful DIY leather chair restoration:
1. Disassembly: Taking It Apart
- Document Everything: Take photos and notes throughout the disassembly process. This will be invaluable when reassembling the chair.
- Remove Existing Upholstery: Carefully remove the old leather upholstery, starting with the easiest sections. Use a staple remover, pliers, and seam ripper as needed.
- Label Everything: Label each piece of leather as you remove it, noting its location and orientation. This will serve as a template for cutting the new leather.
- Inspect the Frame: Once the upholstery is removed, thoroughly inspect the frame for any damage or weaknesses. Repair any issues before proceeding.
- Remove Old Foam and Padding: Remove the old foam and padding. Note how it was layered and attached to the frame.
2. Creating Patterns: Your Blueprint
- Use Old Upholstery as Templates: Lay the old leather pieces flat and trace their outlines onto paper or cardboard. Add seam allowances (typically 1/2 inch) to each piece.
- Measure and Cut New Foam: Use the old foam pieces as a guide to cut new foam to the correct size and shape.
- Cut Batting and Burlap: Cut batting and burlap to cover the foam and frame, allowing for overlap.
3. Cutting and Sewing: The Art of Leather
- Lay Out Leather: Lay the leather hide on a large, flat surface. Place the paper patterns on the leather, optimizing for minimal waste and avoiding any imperfections in the leather.
- Trace and Cut: Trace the patterns onto the leather using chalk or a leather marker. Cut the leather pieces carefully, following the traced lines.
- Prepare the Sewing Machine: Set up your sewing machine with a leather needle and heavy-duty thread. Adjust the tension and stitch length as needed.
- Sew the Leather Pieces Together: Sew the leather pieces together, following the original seam lines. Use a consistent seam allowance and backstitch at the beginning and end of each seam to secure it.
- Test Fit: Before permanently attaching the leather, test fit it on the chair frame to ensure a proper fit. Make any necessary adjustments.
4. Upholstering: Bringing It All Together
- Attach Burlap or Muslin: Staple burlap or muslin to the frame, covering the springs and providing a base for the foam.
- Attach Foam and Batting: Glue or staple the foam to the frame, ensuring it is evenly distributed and properly shaped. Cover the foam with batting for a smooth surface.
- Stretch and Staple Leather: Carefully stretch the leather over the foam and frame, stapling it securely in place. Start in the center and work your way outwards, maintaining even tension to avoid wrinkles and puckers.
- Trim Excess Leather: Trim any excess leather along the edges, leaving enough to fold over and staple down.
- Fold and Staple Edges: Fold the edges of the leather over and staple them to the frame, creating a clean and finished look.
- Add Decorative Details (optional): Add decorative tacks or nails along the edges for a custom look.
5. Final Touches: Perfection and Protection
- Inspect and Adjust: Carefully inspect the finished chair for any imperfections. Make any necessary adjustments to the leather, staples, or trim.
- Clean the Leather: Wipe down the leather with a clean, damp cloth to remove any dust or debris.
- Condition the Leather: Apply a high-quality leather conditioner to protect the leather and keep it supple. Follow the manufacturer’s instructions.
- Reassemble the Chair: Reassemble any parts that were disassembled during the recovery process.
- Enjoy Your Revived Chair! Step back and admire your handiwork.
Dealing with Common Leather Chair Problems
Here’s how to address specific issues you might encounter:
| Problem | Solution |
|---|---|
| Cracked Leather | Use a leather filler to fill the cracks, then sand smooth and apply leather dye or conditioner. |
| Torn Leather | Patch the tear with a leather patch, using leather glue and stitching for added strength. |
| Faded Leather | Apply leather dye or stain to restore the color. Follow the manufacturer’s instructions carefully. |
| Stiff Leather | Apply a generous amount of leather conditioner to soften the leather. Repeat as needed. |
| Sagging Springs | Replace or repair the springs. Add additional support with webbing or burlap. |
| Wobbly Frame | Tighten loose joints with wood glue and clamps. Reinforce weak joints with screws or dowels. |
| Staple Removal | Use the correct staple remover and proceed slowly to avoid tearing the material or damaging the frame. |
Leather Conditioning for Chairs: Preserving the Beauty
Leather conditioning for chairs is crucial for maintaining its supple texture and preventing cracking. It replenishes the natural oils that leather loses over time.
Choosing the Right Conditioner
- Type of Leather: Different types of leather require different conditioners. Full-grain leather needs a richer conditioner than corrected-grain leather.
- Ingredients: Look for conditioners with natural oils and waxes, such as beeswax, lanolin, or neatsfoot oil. Avoid conditioners with harsh chemicals or silicones.
- Reviews: Read reviews and ask for recommendations from other leather furniture owners.
How to Condition Your Leather Chair
- Clean the Leather: Before conditioning, clean the leather with a leather cleaner to remove dirt and grime.
- Apply Conditioner: Apply a small amount of conditioner to a soft cloth.
- Rub it In: Gently rub the conditioner into the leather in a circular motion.
- Let it Absorb: Allow the conditioner to absorb into the leather for at least 30 minutes.
- Buff: Buff the leather with a clean, dry cloth to remove any excess conditioner.
Frequency of Conditioning
- Condition your leather chair every 3-6 months, or more often if it is exposed to direct sunlight or dry conditions.
Cleaning Leather Furniture: Keeping it Fresh
Cleaning leather furniture is an essential aspect of leather chair maintenance tips. Regular cleaning prevents dirt and grime from building up and damaging the leather.
Regular Cleaning
- Dust Regularly: Dust your leather chair weekly with a soft cloth or vacuum with a brush attachment.
- Wipe Up Spills Immediately: Blot up spills immediately with a clean, dry cloth. Avoid rubbing, which can spread the stain.
Deep Cleaning
- Prepare a Cleaning Solution: Mix a small amount of mild soap (such as dish soap) with warm water.
- Test in an Inconspicuous Area: Test the cleaning solution in an inconspicuous area to ensure it doesn’t damage the leather.
- Apply Cleaning Solution: Dip a soft cloth into the cleaning solution and wring it out thoroughly.
- Wipe the Leather: Gently wipe the leather with the damp cloth, avoiding excessive moisture.
- Dry the Leather: Dry the leather with a clean, dry cloth.
- Condition the Leather: After cleaning, condition the leather to replenish its natural oils.
What NOT to Do
- Don’t use harsh chemicals or abrasive cleaners.
- Don’t saturate the leather with water.
- Don’t use heat to dry the leather.
Restoring Worn Leather: Giving it a New Look
Restoring worn leather involves addressing specific signs of wear and tear to bring your leather chair back to life.
Faded Leather
- Leather Dye: Apply leather dye to restore the color. Choose a dye that matches the original color of the leather or a color that complements your décor.
- Leather Stain: Use leather stain to add depth and richness to the color.
Scratched Leather
- Leather Repair Kit: Use a leather repair kit to fill in scratches and blend them into the surrounding leather.
- Leather Balm: Apply leather balm to moisturize the leather and reduce the appearance of scratches.
Stained Leather
- Leather Stain Remover: Use a leather stain remover to remove stains. Follow the manufacturer’s instructions carefully.
- Professional Cleaning: For stubborn stains, consider hiring a professional leather cleaner.
Fixing Cracked Leather Chair: Addressing Unsightly Damage
Fixing a cracked leather chair requires careful attention to detail. Here’s the process:
- Clean the Area: Clean the cracked area with a leather cleaner to remove dirt and grime.
- Prepare the Cracks: Use a leather deglazer. This will remove any existing finish on the leather, and will help prep the area to be repaired.
- Apply Leather Filler: Use a leather filler to fill the cracks. Apply the filler in thin layers, allowing each layer to dry before applying the next.
- Sand Smooth: Once the filler is dry, sand the area smooth with fine-grit sandpaper.
- Apply Leather Dye: Apply leather dye to match the color of the surrounding leather.
- Apply Leather Finish: Apply a leather finish to protect the repaired area.
- Condition the Leather: After repairing the cracks, condition the leather to keep it supple.
Choosing the Right Leather
The type of leather you choose will significantly impact the look, feel, and durability of your recovered chair.
| Leather Type | Description | Pros | Cons |
|---|---|---|---|
| Full-Grain | The highest quality leather, made from the entire hide with the natural grain intact. | Durable, develops a beautiful patina over time, breathable. | Expensive, may show natural imperfections. |
| Top-Grain | The second highest quality, with the top layer of the hide sanded to remove imperfections. | More affordable than full-grain, durable, consistent appearance. | Less breathable than full-grain, doesn’t develop a patina as well. |
| Corrected-Grain | Leather that has been heavily sanded and embossed with a new grain pattern. | Affordable, uniform appearance, resistant to stains. | Less durable than full-grain or top-grain, doesn’t feel as natural. |
| Bonded Leather | Made from scraps of leather bonded together. | Very affordable. | Least durable, doesn’t look or feel like real leather. |
| Faux Leather | A synthetic material that mimics the look and feel of leather. | Affordable, easy to clean, available in various colors and textures. | Not as durable as real leather, doesn’t breathe, can crack or peel over time. |
Leather Upholstery Repair Guide: Seeking Professional Help
While DIY recovery is possible, sometimes it’s best to seek professional leather upholstery repair guide.
When to Hire a Professional
- Extensive Damage: If the chair has significant damage, such as a broken frame or severely damaged springs.
- Complex Design: If the chair has a complex design with intricate details.
- Lack of Experience: If you lack the necessary skills or experience.
- Valuable Heirloom: If the chair is a valuable heirloom or antique.
How to Find a Qualified Upholsterer
- Ask for Recommendations: Ask friends, family, or neighbors for recommendations.
- Check Online Reviews: Read online reviews to get an idea of the upholsterer’s reputation and quality of work.
- Get Multiple Quotes: Get quotes from multiple upholsterers to compare prices and services.
- Ask for References: Ask for references and check them to ensure the upholsterer is reliable and trustworthy.
- Check Insurance and Licensing: Make sure the upholsterer is licensed and insured.
Caring for Leather Seating: Long-Term Preservation
Caring for leather seating properly ensures its longevity and beauty.
Preventing Damage
- Keep Away From Direct Sunlight: Direct sunlight can fade and dry out leather.
- Avoid Extreme Temperatures: Avoid placing leather furniture near heat sources or in areas with extreme temperature fluctuations.
- Protect From Pets: Keep pets off the furniture or cover it with a protective throw.
- Use Coasters and Placemats: Use coasters and placemats to protect the leather from spills and stains.
- Rotate Cushions: Rotate cushions regularly to distribute wear evenly.
By following these leather chair maintenance tips, you can keep your recovered leather chair looking its best for years to come. Remember, regular cleaning leather furniture, combined with proper leather conditioning for chairs, is the key to preserving your investment. And when needed, don’t hesitate to consider a leather upholstery repair guide for more serious issues.
Frequently Asked Questions (FAQ)
Q: How long does it take to recover a leather chair?
A: The time it takes varies depending on the complexity of the chair and your experience level. A simple chair might take a weekend, while a more complex one could take several days.
Q: How much does it cost to recover a leather chair?
Your revamped chair’s price tag hinges on the quality of leather, the plushness of the foam, and any other trimmings you choose, not to mention the skill fee if you enlist a professional’s touch. However, taking the reins yourself dramatically slashes the expense compared to purchasing a brand-new seat.
Q: Can I use a regular sewing machine to sew leather?
A: While possible for thin leather, a heavy-duty sewing machine designed for leather is recommended for best results and durability.
Q: How do I remove stains from leather?
A: Use a leather stain remover specifically designed for the type of stain. Test in an inconspicuous area first.
Q: What’s the best way to clean leather?
A: Regular dusting and occasional cleaning with a mild soap and water solution, followed by conditioning, is the best approach.
Q: How often should I condition my leather chair?
A: Every 3-6 months, or more often if the leather is exposed to dry conditions or direct sunlight.
Hello, I’m Muzammil Siddiqui, the mind behind ChairsFly.com.. With a deep passion for chairs and a wealth of expertise, I created this platform to share my insights, experiences, and knowledge about everything chair-related. From ergonomic solutions to stylish designs, my goal is to guide you in finding the perfect seat for your needs. Let’s embark on this journey of comfort and elegance together!